Writing to Excel in Ranorex
This blog looks at a commonly asked question in Ranorex – how do we write back to an Excel data source when using a data-driven test?
There are many approaches to this, but in this example we are going to use Microsoft’s Excel Interop Object Model. The example is a standard Ranorex C# project and this example can be found on GitHub at: https://github.com/edgewords/ranorex-datatable-write
To use the Excel Interop API there is one caveat, we have to have Microsoft Excel installed on the PC.
Project Setup
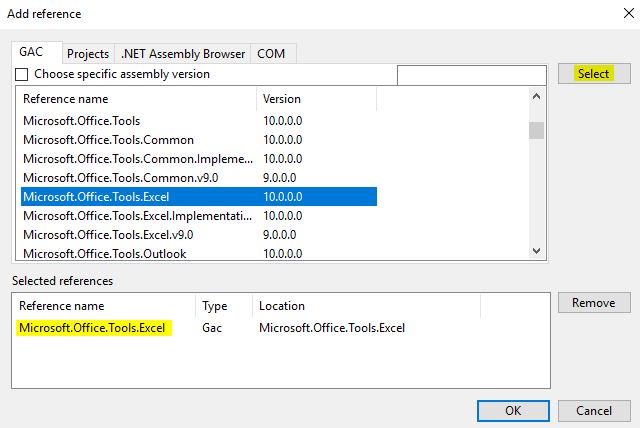
To write to Excel, we will need to add a reference to the Excel Interop in our project. To do this:
- Right-Click on the References folder in the Project Explorer
- Select Add->Add Reference
- Choose the GAC tab
- Select Microsoft.Office.Tools.Excel library and click the Select button
- Click OK

Test Suite and Data Setup

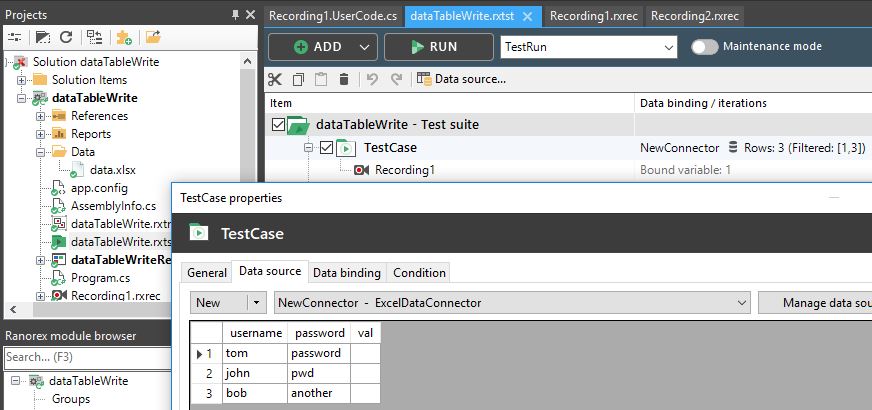
So in the above screenshot, you can see in the Project Explorer that I have created a folder called Data and in this I have created an Excel Spreadsheet called data.xlsx
I have added this spreadsheet as a data source to the Test Case shown in the Test Suite above. Finally you can see the contents of the spreadsheet – it has one worksheet and three columns. In our Test Case we will read data from the first two columns, then write values back to the third (val) column.
Recording Module

The Test Case has one Recording Module in it – Recording1.rxrec This only has two actions. The first just reports the read value from the spreadsheet, the second is where the writing back happens – a User Code Action.
User Code to Write to Excel
So this is where the magic happens!
We need to add our using statements to reference the Excel Interop library at the top of the module, then we can use the Excel Application Model
using System;
using System.Collections.Generic;
using System.Text;
using System.Text.RegularExpressions;
using System.Drawing;
using System.Threading;
using WinForms = System.Windows.Forms;

using Ranorex;
using Ranorex.Core;
using Ranorex.Core.Repository;
using Ranorex.Core.Testing;

// -- Add the Excel COM reference in:
using Microsoft.Office.Interop.Excel;

namespace dataTableWrite
{
    public partial class Recording1
    {
        /// <summary>
        /// This method gets called right after the recording has been started.
        /// It can be used to execute recording specific initialization code.
        /// </summary>
        private void Init()
        {
            // Your recording specific initialization code goes here.
        }

        public void writedata()
        {
            //-------------------------
            // Excel example - remember to add the micorosft.interop.excel reference to the project!
            //-------------------------
            //String xlPath = @"C:\Users\tom\Documents\Ranorex\RanorexStudio Projects\dataTableWrite\dataTableWrite\Data\data.xlsx";
            // -- or a relative path to from the bin/debug folder:
            String xlPath = TestSuite.WorkingDirectory + @"\..\..\Data\data.xlsx";

            Microsoft.Office.Interop.Excel.Application xlApp = new Microsoft.Office.Interop.Excel.Application();
            Microsoft.Office.Interop.Excel.Workbook xlBook = xlApp.Workbooks.Open(xlPath);
            Microsoft.Office.Interop.Excel.Worksheet xlSheet = (Microsoft.Office.Interop.Excel.Worksheet)xlBook.Worksheets["Sheet1"];

            xlApp.DisplayAlerts = false;

            // -- Find out the current row we are on from Ranorex & write a value to column 3
            // -- add a row as row 1 in excel is the ranorex column headings!
            xlSheet.Cells[TestSuite.CurrentTestContainer.DataContext.CurrentRowIndex + 1, 3] = "hello";
            // -- you can also use cell references such as 'A2'
            //xlSheet.Cells(C1)="hello";
            xlBook.Save();
            xlBook.Close();
        }

    }
}
In the real-world we would create the writing to Excel as public Methods in a User Code Library, as then we can use them anywhere in our Project. But this blog is just a simple example to help get you started with writing to Excel
For Advanced Ranorex training, see:
Ranorex Advanced for U.K. and rest of world
