Part 1 Exploring Visual Regression Testing with Playwright Test
Visual regression testing allows you to automatically detect visual changes in your application, ensuring that new code doesn’t inadvertently alter the user interface in unexpected ways. Playwright Test expands upon the web automation provided by the Playwright Library, adding a testing framework, runner, reporting system and other tools. With Playwright Test, you can capture screenshots, compare them against baseline images, and pinpoint visual discrepancies with precision.
In this and the next blog post we’ll dive deep into the world of visual regression testing with Playwright Test.
Text rendering
Let’s start with a very simple test against a simple site:
import {test, expect} from '@playwright/test';

test('Compare against golden reference', async({page})=>{

    await page.goto("https://www.edgewordstraining.co.uk/webdriver2/docs/forms.html");
    await page.locator('#textInput').fill("Hello World"); //Set initial state

    //On first run - capture 'golden' reference screenshot
    //On second run, compare captured screenshot against reference
    await expect(page.locator('#textInput')).toHaveScreenshot();

});
The intention is to use .toHaveScreenshot() to check that the text “Hello World” has rendered as expected in the text box like so:

Note I wrote ‘rendered’ i.e. how it is visually displayed on screen – not that the text “Hello World” is merely present. I could check for the text itself by using…
await expect(page.locator('#textInput')).toHaveValue('Hello World');…but for whatever reason I’m concerned with how the text visually looks.
The first time this test is executed it will fail. This is expected.

We’re expecting the element ‘#textInput’ to have a screenshot – a base image against which we can compare the current test run’s rendering. While the first run fails, Playwright Test helpfully creates that baseline (or “golden”) reference image.

It does this in a new folder alongside your test spec file (“<spec filename>-snapshots”), and automatically names the captured image following the pattern “<test name>-<number>-<browser>-<operating system>.png”.
If you’re not a fan of this naming convention you can specify the file name to use for your snapshot, but the browser and OS used will still be appended to your chosen file name:
await expect(page.locator('#textInput')).toHaveScreenshot('textbox.png');

In either case, re-running the test with the base golden reference image present should result in a pass:

Picking a different browser to run with (in this case Firefox), will result in the test failing again and a new reference image being captured:

Cross browser, Cross OS
Cross browser testing (and cross operating system testing) will require multiple reference images covering each combination you intend to test as there will be different renderings across the various permutations.

Just in case it’s not clear from the above screenshot lets take a closer look at the reference images captured so far:
-

- Playwright Chromium rendering of “Hello World”
-

- Playwright Firefox rendering of “Hello World”
-

- Difference between the images. Black represents no difference.
Almost as an aside, the zoomed in view of the Firefox reference image caught my attention as it clearly uses greyscale antialiasing to smooth the edges of fonts. Mozilla’s official Firefox builds use sub pixel antialiasing (on Windows referred to as ClearType ) as evidenced by the colour fringing around the text, just as Playwright’s Chromium build do (and official Chromium and Google Chrome releases for that matter).
-

- Mozilla Firefox rendering “Hello World”
-
- Playwright Firefox rendering of “Hello World”
-

- Difference image comparing Firefox Mozilla and Playwright renderings
For completeness here’s a screenshot of the same element taken using Chromium on Linux:

Again you will see font rendering and antialiasing differences compared to Chromium on Windows – and in fact these differences can and probably will further vary across different Linux distributions.
The point for now is we’ll need reference images for each environment we test with, and Playwright Test will capture these ‘golden’ images whenever we first run the test in that environment.
(I will however need to return to this in part 2.)
If I swap the reference image captured using Playwirght’s Firefox for one taken using Mozilla’s own build and rerun the test it fails stating that there are 226 pixels different between the current rending and the reference image:

You can see this more clearly at the bottom of the report generated by Playwright Test (available at playwright-report/index.html or by simply running npx playwright show-report in the terminal):

The report gives you various ways to easily visualise and understand the difference between the actual and expected (reference) image. I particularly like dragging the slider view left-to-right-to-left. See if you can spot the sub pixel antialiasing vs greyscale antialiasing above.
There may be a few pixels or areas where you decide it’s OK if the reference image(s) and actual run time captured image(s) differ. To handle that you can pass some additional options to .toHaveScreenshot()
![]()
Alternatively if you would prefer to express the allowable difference as a ratio instead of an absolute number of pixels you can do that with maxDiffPixelRatio and a value from 0 to 1.
There are some further options for masking out (or even hiding) problematic changeable areas such as mask and stylePath we could look at in future (if there is interest!).
For now however lets look at colour variation. What if an object in an image stays the same but it’s colour changes. What will Playwright Test do?
Colour variations
To investigate let’s start with a new test:
test('Colour differences', async({page})=>{
  await page.goto("https://www.edgewordstraining.co.uk/webdriver2/docs/basicHtml.html");
  await expect(page.locator('td:first-of-type img')).toHaveScreenshot();
});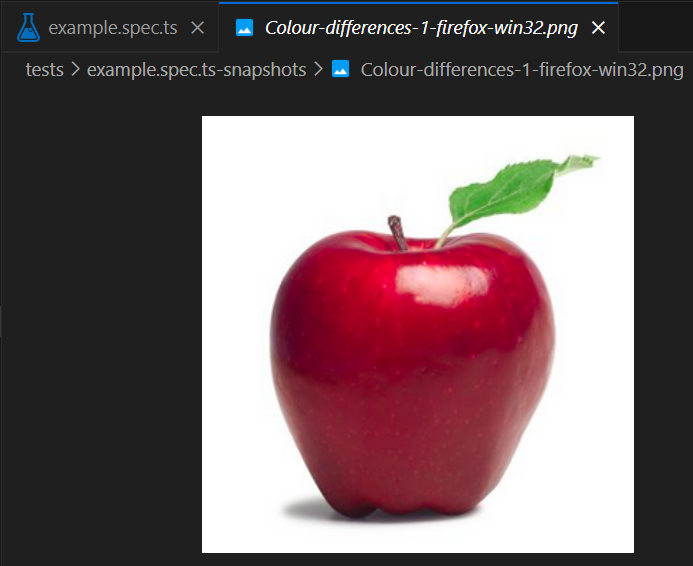
The resulting reference image of a tasty looking apple
Using a CSS filter, I’ll add a step that will change the colour of the apple before the comparison is performed:

With that, the test now fails. Lets take a look at the report:
![]()
Only three pixels were considered different by Playwright Test. Let’s take a look at the slider view to see how visualy different the expected and actual results were. With only three pixels differing it can’t be that differ…

Oh. Playwright Test is surprisingly tolerant of colour changes and variations out of the box.
Fortunately this tolerance is adjustable using the “threshold” option. Playwright uses 0.2 by default, setting it to 0 means that any colour variation should result in a failure.


As so it does.
Finally for this introduction if there have been changes to your application that mean you will need to regenerate all your reference images you can do so with the command npx playwright test --update-snapshots
Summary
toHaveScreenshot() is used to check that browser and OS rendering during a test run matches previously captured reference/baseline images. By default it is surprisingly tolerant of colour variations but can be unforgiving when it comes to other pixel variations. Options such as maxDiffPixels and threshold can control this behaviour.
toHaveScreenshot() does require the reference image to be present before the test executes in order to perform the comparison. What if we want to capture a screenshot at run time, do something, then capture a new screenshot and compare the two? For that we’ll need to do a bit more work…in part 2.